Chic Easter Nail Art: Elevate Your Spring Manicure Beyond Basic Bunnies
Easter isn't just a holiday; it's a celebration of spring's vibrant arrival, a time when pastel hues, delicate florals, and a fresh sense of renewal sweep through our lives. And what better way to embody this beautiful aesthetic than with a perfectly curated manicure? This year, ditch the overly literal bunny drawings and embrace a more sophisticated, modern approach to your Easter nail art. We're diving into over 30 nail ideas for Easter that blend classic springtime charm with contemporary style, ensuring your fingertips are as chic as they are festive. The key to a truly elegant Easter manicure lies in striking a balance. As manicurist and Nailing Hollywood CEO Mazz Hanna wisely notes, it’s about capturing that "cutesy vibe without going full-throttle into kitschy territory." Think subtle nods, exquisite color choices, and innovative finishes that make your nails feel special, not childish. From serene pastels to playful patterns, let's explore how to achieve an Easter look that lasts long after the egg hunt is over.The Essential Easter Color Palette: Beyond Pink and Purple
While soft pink and lavender often reign supreme during Easter, the season offers a much broader spectrum of delightful pastels that can truly elevate your look. Expanding your color horizons is the first step to a chic Easter mani.- Classic Blues and Greens: Don't underestimate the power of cool tones. Hanna highlights powder blue as a classic Easter shade that "pairs beautifully with other pastels and neutrals." Imagine it as a base for delicate white floral accents or a soft ombre with a complementary peach. Similarly, mint green offers a "serene, natural essence" that effortlessly complements any Easter ensemble. This understated color is perfect on its own for a minimalist vibe or as a canvas for subtle gold leaf. For more inspiration on these calming hues, explore Easter Nail Trends: Serene Mint to Joyful Orange Pastels.
- Joyful Oranges and Yellows: For those seeking a brighter, more unconventional approach, Hanna suggests pastel orange and yellow. "Orange is fun," she shares, adding that "it’s playful, and it radiates a joyful energy that will brighten your mood." Pair a pale orange with a sunny yellow for a cheerful gradient, or use it for vibrant floral details. Pastel yellow, with its "subdued brightness," introduces warmth and lightness without being overwhelming. It's a fantastic choice for a soft, sunny base or for creating delightful daisy designs.
- Sophisticated Pinks and Lavenders: Even the most traditional Easter colors can be modernized. Instead of a flat pastel, opt for a milky, sheer pink or a lavender bordering on neon for a vibrant statement. Consider a soft pink base with an iridescent finish for a subtle shimmer, or a lavender accented with delicate silver lines.
- Unexpected Teal: For a truly contemporary edge, consider muted teal. While not a conventional pastel, a soft teal can evoke a spring-ready feel when paired with nude shades and minimalist floral designs. It offers a "moody, contemporary feel" while still blending seamlessly with the Easter aesthetic.
For a deeper dive into expert color recommendations, be sure to read Mazz Hanna's Top Pastel Nail Ideas for a Modern Easter Mani.
Modern Twists on Classic Easter Motifs
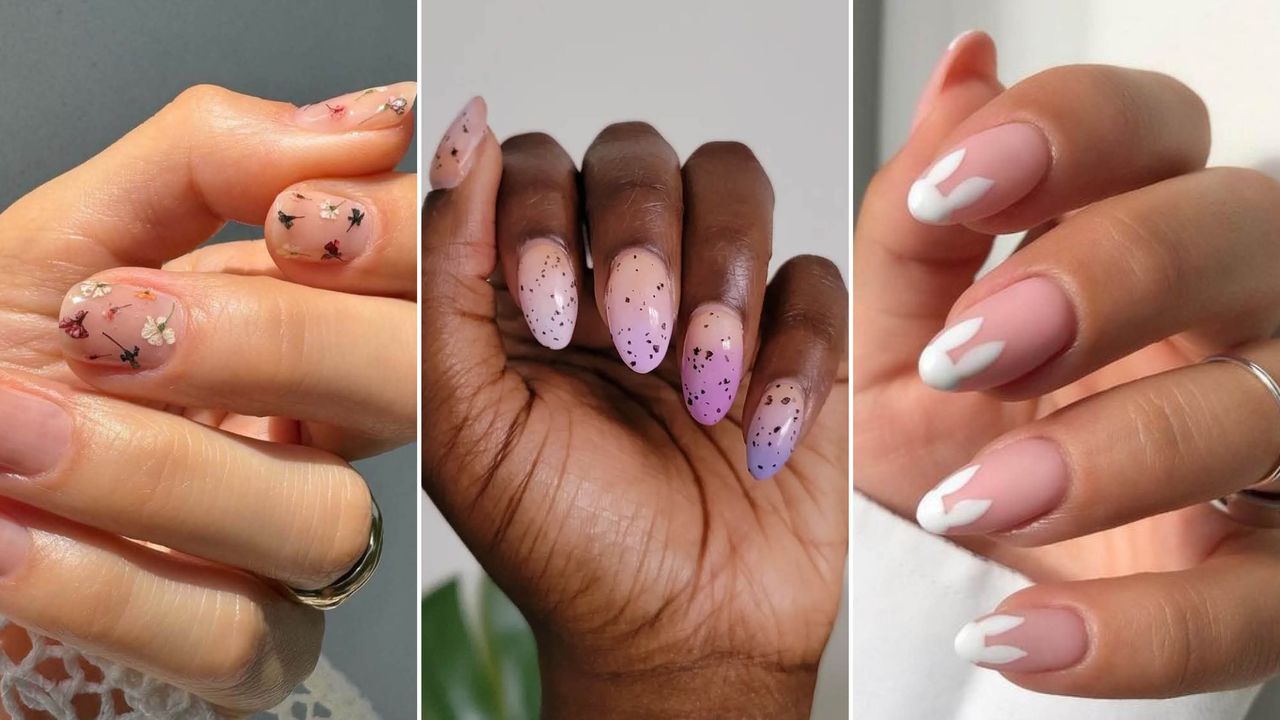
The trick to keeping Easter nail art chic is to interpret traditional motifs with a fresh, artistic perspective. Forget the cartoonish; think elegant suggestions and sophisticated abstractions.- Dainty Florals, Redefined: As Hanna notes, "Floral nail art is perfect for Easter since it marks the beginning of spring." Instead of overly complex bouquets, focus on delicate, dainty flowers.
- Minimalist Blooms: Think single, small flowers on an accent nail, or scattered tiny white blossoms across a pastel base.
- Oversized Daisies: For a playful yet artistic statement, recreate Dayanna I. Sapiens' oversized pastel daisies using a milky nude base and various dotting tools. The large scale makes them feel artistic rather than saccharine.
- Petal Tips: A creative spin on the French manicure, "petal tips" feature soft, rounded shapes at the nail's edge in an array of sweet, spring-forward colors like red, lavender, yellow, pink, and blue.
- Elegant Easter Eggs: Capture the essence of dyed Easter eggs without the literal crack.
- Cracked Egg Chic: One standout idea involves a negative space design resembling cracked open Easter eggs, made sophisticated with a delicate silver border. This look embraces pastels without being overly sweet.
- Upside-Down Frenchies: For "dyed egg realness without the mess," try colorful lines on both the tips and the cuffs of your nails. This "upside-down Frenchie" approach is cute, colorful, and ensures your mani lasts well beyond the holiday weekend.
- Subtle Bunny Nods: If you love the idea of bunnies but want to keep it refined, go for understated hints.
- Tiny Ears and Dots: A soft blue and neutral combination, elevated with tiny bunny ears on an accent nail and subtle dotted details. This approach is seasonal, feed-worthy, and retains its charm long after the chocolate bunnies are gone.
- Abstract Silhouettes: Consider a minimalistic outline of a bunny ear or tail on a single nail, using fine line work in a contrasting pastel.
Innovative Finishes and Techniques for a Standout Mani
Beyond color and design, the finish and application technique can completely transform your Easter manicure, taking it from pleasant to truly memorable.- The Glazed Donut Effect: This trend is a game-changer for pastels. A simple multicolored pastel mani can be "taken to the next level by getting the glazed donut treatment." The pearlescent, shimmery topcoat adds a subtle yet luxurious glow that makes any pastel shade look richer and more sophisticated.
- Shimmer and Iridescence: Elevate your usual pastel shades with a shimmery or iridescent finish. You can leave a glitter base on its own for a captivating sparkle, or use it as a base for small, dainty flower decorations for an added seasonal touch. This adds depth and catches the light beautifully.
- Negative Space Designs: Incorporating negative space is a hallmark of modern nail art. It allows parts of your natural nail to show through, creating a clean, sophisticated look. Use it to outline abstract shapes, create geometric patterns, or as seen in the "cracked Easter egg" idea, to add a contemporary edge to traditional motifs.
- Ombre and Gradients: Seamlessly blend two or more pastel shades for a soft, ethereal look. This can be done vertically across the nail, horizontally from cuticle to tip, or even by painting each nail a slightly different pastel shade for a subtle rainbow effect.
- Matte Top Coat: For an unexpected twist, apply a matte top coat over your pastels. This can create a velvety, sophisticated finish that adds a unique texture and elevates the overall chicness of your design. It's a subtle way to stand out from the crowd of glossy manicures.
- Micro French Tips: A super thin, delicate line of pastel at the tip of your nail offers a minimalist yet elegant take on the classic French manicure. You can even use different pastel colors for each tip.
DIY Tips for Achieving Your Chic Easter Look at Home
You don't need a professional salon visit to achieve a stunning Easter manicure. With a few tools and a little patience, you can recreate many of these chic nail ideas for Easter yourself.- Nail Prep is Key: Always start with clean, filed, and buffed nails. Push back or gently trim cuticles. This creates a smooth canvas for your art and helps your manicure last longer.
- Base Coat First: Apply a good quality base coat to protect your nails from staining and provide an even surface for polish application.
- Invest in Basic Tools: A fine detail brush (like an art brush with very thin bristles) and a dotting tool (or even the head of a pin) are invaluable for creating delicate florals, dots, and intricate designs like tiny bunny ears.
- Thin Coats are Best: Apply polish in thin, even layers, allowing each coat to dry completely before applying the next. This prevents bubbling and ensures a smoother, more professional finish.
- Patience is a Virtue: Don't rush the drying process, especially between different colors or design elements. A quick-dry top coat can help, but patience prevents smudges.
- Top It Off: Always finish with a high-quality top coat. This adds shine, protects your design, and extends the life of your manicure. Choose a glossy finish for a vibrant look or a matte top coat for a sophisticated, velvety touch.
- Practice Makes Perfect: Don't be discouraged if your first attempt isn't flawless. Nail art takes practice. You can even try designs on a nail art wheel or practice tips first.